A wide variety of mechanical and electrical thermometers sense and control process temperatures
Regular calibration of these thermometers is critical to ensuring consistent quality of manufactured products, as well as providing regulatory compliance for some industries.
Temperature is one of the most frequently measured parameters in industrial processes. A wide variety of mechanical and electrical thermometers are used to sense and control process temperatures. Regular calibration of these thermometers is critical to ensuring consistent quality of product manufactured, as well as providing regulatory compliance for some industries.
The Basics
Most simply stated, temperature calibration consists of placing a thermometer under test into a known, stable temperature environment. A comparison is made between the actual temperature and the reading indicated by the thermometer under test and the difference is noted.
Adjustments can then be made either directly to the thermometer or to its readout. Electrical thermometers are adjusted by mathematically re-creating the coefficients used by SMART transmitters or other readout devices to translate their electrical output to temperature. Many mechanical thermometers, such as dial gauges can be adjusted by turning a dial or other mechanical device. In some cases, such as liquid-in-glass thermometers, direct adjustments are not possible and offsets must be noted.
In industrial applications, the temperature environment is usually provided by a drywell, or "dry-block" calibrator, or a micro-bath. Both offer portability and a wide range of temperatures. Drywells use high stability metal blocks with drilled wells to accept the reference and UUT. Drywells typically cover ranges from -45°C to 1200°C and micro-baths cover ranges from -25°C to 200°C. Micro-baths are similar in size to drywells but use a small tank of stirred fluid instead of a metal block. Micro-baths offer significant advantages when calibrating short or odd shaped probes.
The "actual" temperature of the bath or dry-well is determined by a reference thermometer, which may be either a thermometer internal to the heat source or an external reference thermometer operating independent of the heat source.
External or Internal Reference
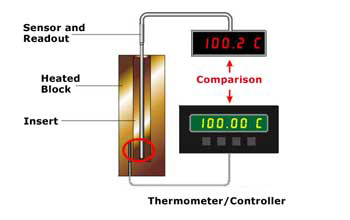
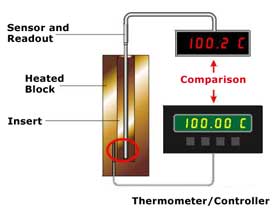
Figure 1: Heat source as reference standard Micro-baths and dry-wells have a built-in sensor to provide a feedback loop to the unit's controller and to provide a temperature reading to the user. The manufacturer of the heat source (or a third-party laboratory) can calibrate this sensor so the unit displays a traceable temperature within a stated uncertainty. For some applications, this uncertainty level (typically ±1-2°F) is adequate. Using an internal reference is sometimes preferred because it requires fewer instruments and enhances portability for field applications. This method is illustrated in Figure 1.
The reference system, however, should be more accurate than the process system being calibrated. The generally accepted Test Uncertainty Ratio (TUR) is 4:1 (i.e. the reference should be four times more accurate than the sensor or system being calibrated). Therefore, if a process thermometer is being relied on for correct readings within ±2°F, the test system should typically be ±0.5°F or better at each temperature in question. As a general rule, temperature uncertainties are larger at higher temperatures.
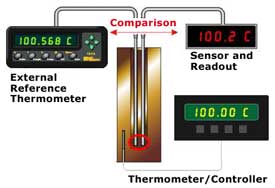
Figure 2: External reference standard Where uncertainty requirements are more rigorous, external reference thermometers help improve system uncertainty (see Figure 2). These thermometers—usually platinum resistance thermometers (PRTs) or thermistors—can often be calibrated to a few hundredths of a degree and can be read by electronic readout devices that contribute little to total measurement uncertainty. These systems can provide measurements with uncertainties as low as ±0.05°F or ±0.02°F—or better. The reference probe and readout should be periodically re-calibrated, preferably by an accredited cal lab, to assure performance specifications and maintain traceability.
Because external thermometers are more accurate, they increase the relative significance of other components of calibrations uncertainty, such as uniformity and stability. It is, of course, critical in any calibration to account for all sources of uncertainty in the process.
System or Component Calibrations
Most temperature sensors used in processes are read by transmitters, which send a 4 to 20 mA signal to a control panel, which then displays the temperature for process monitoring. Such systems involve three instruments, all of which require periodic calibration. Of these three, the largest errors are often found in the temperature sensor (which is subject to drift for a variety of reasons), so its calibration is of particular concern.
More Details or Order Online:
Hart Scientific Field Temperature Dry Wells
High-Temperature Field Dry Block Calibrator
Industrial Dual-Block Calibrator
Several calibration methodologies are used in the process plantÑthe most representative method being to calibrate the complete measurement system from sensor through transmitter to indicator or controller; alternatively each component of the measurement system can be individually calibrated.
The temperature sensor can be individually calibrated using a drywell or micro-bath heat source to simulate the process temperature. If the temperature sensor is electrical, a readout device measures its output. Adjustments are then made to the thermometer or its coefficients as discussed earlier.
The transmitter is calibrated using a precision simulator to generate the resistance or voltage output from the temperature sensor and input to the transmitter. The simulator also measures the resulting transmitter current or voltage output. The transmitter is adjusted to ensure that the output follows the input, e.g. for a 4 to 20 mA transmitter with a range of 0°C to 200°C, 4 mA corresponds to 0°C and 20 mA corresponds to 200°C. The simulator provides a wide range of input and output ranges to cover all resistance thermometer and thermocouple types.
The indicator or controller is also calibrated using a precision simulator to generate simulate the resistance or current input from the transmitter. The indicator or controller is adjusted so that the display variable matches the simulated input.
The complete system is calibrated using the drywell or micro-bath to compare the reference probe and UUT. The transmitter is adjusted to ensure that the indicator or controller agrees with the reference probe readout. This calibration method is most representative of the real process, is faster and simpler to perform.
Accredited Calibration Services
Calibration of the thermometer standards used to calibrate industrial thermometers provides traceability, which means that measurements are traceable to national and international standards. Traceability to international standards ensures that measurements made in one country agree with measurements in another country, which is particularly important for companies using similar manufacturing processes at different locations around the world.
More and more calibration labs throughout the U.S. are being accredited to international standards such as the ISO Guide 25. Accreditation ensures that a lab's quality systems, uncertainty levels, and traceability statements have been examined and independently verified. NVLAP and A2LA are the primary accrediting bodies in the U.S. A recently signed international agreement ensures that accrediting bodies in almost every developed nation also recognize accreditations granted by NVLAP and A2LA.
In summary, process plant temperature calibrations require a good reference thermometer with readout, a drywell and/or micro-bath heat source, and a precision simulator. These instruments, in turn, should be periodically calibrated by a reputable lab, preferably one that is accredited and can prove traceability.
by Bernard Morris, Vice-President of sales, Hart Scientific, Inc. Reprinted with permission of Hart Scientific, Inc.


